Showing posts with label Blogger. Show all posts

Monday, 24 June 2013

Create Table of Contents Page With Thumbnail in Blogger

Table of contents page is also know as Sitemap.Table of contents is one of the key factor for getting traffic for your blog or website.In table of contents all the posts written are shown in an order manner.
Through your sitemap one can get to know about your posts.So it is the source of traffic for your blog.The sitemap with atom or rss doesnt look attractive .A pro blogger named Akith Kumar Singla brought a unique and attractive design using Thumbnail in blogger.I applied it to my blog.
It looks like this:

click on it to enlarge
So lets come to the topic 

How To Create HTML Sitemap With Thumbnail?

Follow below steps to add this attractive table of content page in your blog.

  1. Go to your blogger blog.

  2. Now Navigate to Pages > New Page > Blank Page. (Note: You can create a post too instead of static page.)

  3. Switch it to HTML mode.

  4. Paste Below code in the body area.

  5. <script src='https://bloggertipstricks.googlecode.com/files/bloggertipstricks.com-sitemap.js'>
    </script>
    <script style='text/javascript'>
    var numposts = 999;
    var showpostthumbnails = true;
    var displayseparator = true;
    </script>
    <script src="http://www.techlosoft.blogspot.com/feeds/posts/default?orderby=published&amp;alt=json-in-script&amp;callback=recent&amp;max-results=999"></script>
    <style type="text/css">
    .sitemap-container {width: 100%; height: 105px; border-top: 2px solid #eee;}
    .sitemap-container:hover {background-color:#fafafa;}
    .thumbnail {width: 60px; height: 90px; float: left; top:0px;}
    .posttitle {height: 90px; float: left; line-height: 90px; margin-left:25px; display:block; width:80%; white-space:nowrap;}
    #postimg {margin-top: 10px;  -webkit-border-radius: 50px; -moz-border-radius: 50px; border-radius: 50px; width: 60px; border: 2px solid #eee;}
    #list{list-style-type: none; padding-left: 0px; margin-left: 0px;}
    </style>

  6. Replace www.techlosoft.blogspot.com with your own blog URL.

  7. Click on Publish button.

  8. That's it.
Note: Above code will show posts from all the labels in your blog. You can replace it with below one to create sitemap page for a single label.
<script src='https://bloggertipstricks.googlecode.com/files/bloggertipstricks.com-sitemap.js'>
</script>
<script style='text/javascript'>
var numposts = 999;
var showpostthumbnails = true;
var displayseparator = true;
</script>
<script src="http://www.techlosoft.blogspot.com/feeds/posts/default/-/Label%20Name?orderby=published&amp;alt=json-in-script&amp;callback=recent&amp;max-results=999"></script>
<style type="text/css">
.sitemap-container {width: 100%; height: 105px; border-top: 2px solid #eee;}
.sitemap-container:hover {background-color:#fafafa;}
.thumbnail {width: 60px; height: 90px; float: left; top:0px;}
.posttitle {height: 90px; float: left; line-height: 90px; margin-left:25px; display:block; width:80%; white-space:nowrap;}
#postimg {margin-top: 10px;  -webkit-border-radius: 50px; -moz-border-radius: 50px; border-radius: 50px; width: 60px; border: 2px solid #eee;}
#list{list-style-type: none; padding-left: 0px; margin-left: 0px;}
</style>
Replace www.techlosoft.blogspot.com with your blog URL and Label%20Name with your label name.

Remember: If your label name consist more than one word, then don't forget to add %20 between each of them.

For example: Blogging Tips will be written as Blogging%20Tips.

The label name is case sensitive, so take care of it.
Read More

Thursday, 13 June 2013

5 Useful Google Chrome Extensions for Bloggers


http://www.postrunner.com/261.html
Are you a web browsing ninja, or just plodding along with the default settings?
Google Chrome is now the browser of choice for almost half of the World-Wide-Web-browsing population of the Earth. So it’s a safe bet you either use it already, or you’ll give it a try soon.
There’s a ton of extensions you can add to your Google Chrome to customise it with tools that make blogging and promoting your blog easier. Here are just a handful of my current favourites:
5 Useful Chrome Extensions for Bloggers

1. WordPress Stats

This handy extension uses your WordPress.com account and Akismet API key to give you access to your blog’s stats from your Google Chrome. A little clicker showing your page views for the day is always visible, overlaid on the WordPress Stats icon in Chrome. No matter what web page you’re viewing, you can click that icon to check your blog’s top posts, referrers, search terms and links in an instant –all without leaving the site you’re on at the time. Get it here.

2. Evernote

Yep, you can get an Evernote extension for Google Chrome that lets you add anything you’re browsing to your Evernote quickly and simply. If you’ve never used Evernote, you’re missing out; it’s a taggable, searchable repository for all your read-it-later articles, URLs, podcasts, and notes to self. Get it here.

3. TinEye

Once you’ve added this extension to your browser, you can easily seek out copies of an image online. So the next time you see an uncredited image you love on a blog, just open TinEye up and it’ll scan the internet for matching images. That means you can track down higher-resolution copies, or find out about licensing to get a copy you can use on your own blog. Get ithere.

4. Rizzoma Research Sidebar

This is such a huge timesaver, I’m glad I found out about it! With the Rizzoma sidebar open, you can click all around the web while keeping your research notes together in one browser sidebar that follows you everywhere you go online. It’s much simpler and less time-consuming than clicking in and out of a Word document or Google Doc every time you want to update your notes. Get it here.

5. PlaceIt

You know those slick-looking photos you often see of a website or ebook being displayed on a shiny tablet, laptop or smartphone? You can create those in just a couple of clicks using this awesome tool. All you need is an image: an ebook front cover, a screenshot of your blog’s homepage, or a still from your video clip, for example. Then just choose the scene you’d like to see your image appear in, upload your image, and PlaceIt takes care of all the fiddly tilting and aligning to make it look awesome. Get it here.
With these 5 extra tools to simplify what used to be complex or time-consuming tasks, you’ll have more time to spend on blogging and promoting your work. Go ahead, try one and let me know what you think!

Read More

Blogging tips for absolute beginners : Pro Blogger Tips

Without any previous experience in blogging it is very problematic and difficult to start blogging career. So, you need to learn some primary tips from experienced and professional bloggers. And when you implement those primary tips in your blogging you too can become experts. Therefore, examine the following tips

blogging tips for begginers
Image Source :freedigitalphotos.net

Start a blog:

How to start a blog? Firstly register one domain, it should be extension with .com. Give first preference to .com. Before register blog domain do some research? On what means, whether your selected blog name, really mirrors the sector or niche you want to go about or not. Choosing godaddy.com is best for Domain registration. For this select HostGator as hosting. Apt for 100% up to quality hosting, don’t go for lesser one. Better not to touch cheap hosting.  choosing blog platform WordPress best and recommended . There are many but word press is believable and stronger. And it is a blogging platform preferred by many. After gathering everything, then select the theme based on your zeal, enthusiasm and interest.

Start writing:

First begin with 8-10 posts. Write daily allot schedule time and then post, only in that allotted time daily. To say in one word, if you fixed at 1 ‘O’ clock, publish only at 1 ‘O’ clock. First create about me page, then contact page. Jot on them clearly, your goals and all the things what all you want to express without any hesitation.
Concept must be clear about your blog. Create archive page. Even then there are mistakes at the beginning don’t bother and lose confidence, try to do your own, and don’t copy anything from anywhere. Go through many famous blog writers posts, it is really useful

Traffic Earning:

Getting traffic is the main thing. For this you need to join in blogging network. And also create RSS subscription. Write eBook, joining in most forums, and getting signature in forums discussion. Concentrate more on SEO concept.

Notifying:

Every reader is valuable one. Therefore try to satisfy all the readers. And solve their problems. To get developed recognize the significance of social networking. Mould the readers or customers. Be positive always pay out the time with patience earning should not be your primary goal. First learn, make blogging your habitual habit then think of earning.
So, primarily, if you implement the above mentioned points. Sooner you start working towards ‘Victory’.
We hope lot with my article, have anything missing in this, convey to me and am expecting your feedback also. Stay with us for upcoming.
Read More

Stylish Related Posts With Thumbnail Widget For Blogger

Stylish Related Posts
Showing related posts with thumbnail below your post body is very important if you want to increase your blog page views. It also helps to reduce bounce rate of blog. Once your visitors finish reading the article, they will be keen to read more about related topic. It's a best practice to show more related posts in blogger blog which help to increase reader engagement in reading more posts and they will stay at your blog for longer time. And if they stay at your blog for longer time then it will be a plus point to your blog which helps to improve its ranking in search engines as Google considered visit time as a ranking factor. Let see how to add this widget into your blog.


Add LinkWithin To Blogger


  1. Go to Linkwithin.

  2. Fill some easy information and click on Get Widget button. See below screenshot.

  3. related posts widget

  4. A page will open. Now click on Install Widget link.

  5. related posts

  6. Next click on Edit Template link.

  7. edit template
  8. Now replace the code which you see with the below one:

  9. <b:includable id='main'><b:if cond='data:blog.pageType == "item"'><data:content/></b:if></b:includable>

  10. Now click on Add Widget button and drag the gadget below post body. See below screenshot.

  11. drag gadget

  12. Click the save arrangement button and you are done!
Related posts for blogger widget is now added to your blog. At this time it will look very dull like this: 
demo

To make it stylish and beautiful we have to add some CSS code into our blog template. So, let see how to do it.

Apply CSS To Change Look


Now the interesting part is applying CSS to make over the default dull gadget to a stylish related posts widget. Let see how to add related post plugin code in blogger.
  1. Log in to your blogger account.
  2. Go to Template.
  3. Backup blog template before doing any changes.
  4. Click on Edit HTML > Proceed.
  5. Search this code ]]></b:skin> and replace it with the below code.


  6. /*---Related Posts---*/
    #linkwithin_logolink_0 {
    display:none!important;
    }
    #lws_0 {
    clear: both!important;  
    margin: 0 0 20px 0!important;
    }

    .linkwithin_outer {
        margin: 1px 0px !important;
       background:url("https://blogger.googleusercontent.com/img/b/R29vZ2xl/AVvXsEhRR0rvH0CFfRfaTMU7QXktvardgh76jBsgPgS46OE6N70DFw2l30q21UvLgheYKFMHubscLZm5pypeHcy1V7PkDqQvXSRdWquLy8SpFAPUJdyykse-8IUQ3knEEKJhkb1Ak3VrnbKgpEg/s400/mbt-related-posts.gif") repeat scroll rgb(42, 42, 42);
        height: 260px;
          width:590px!important;
        padding: 0px !important;
        box-shadow: 0px 4px 4px -4px rgba(0, 0, 0, 0.7) !important;
        border-radius: 5px 5px 5px 5px;
        }

    .linkwithin_inner {
    width:590px!important;
    }

    .linkwithin_text {
    margin: 0px !important;
        padding: 10px !important;
        font-family: "Droid Sans",Helvetica,Arial,sans-serif;
        font-size: 1.35em;
        color: rgb(255, 255, 255);
        font-weight: 700;
        line-height: 1.35em;
        text-transform: capitalize;
        background-color: rgb(18, 18, 18);
        border-bottom: 1px solid rgb(0, 0, 0);
        border-top-right-radius: 5px;
        border-top-left-radius: 5px;
        background-image: -moz-linear-gradient(center top , rgb(36, 36, 36), rgb(18, 18, 18));
    }
    .linkwithin_posts a {
       border-right:0px!important;
        margin: 10px 0px 10px 20px !important;
    }

    .linkwithin_posts a:hover {
       border-right:0px!important;
        margin: 10px 0px 10px 20px !important; background:none!important;
    }
    #linkwithin_logo_0 {display:none;}
    .linkwithin_img_0 {
        border: 1px solid #666 !important;
        padding: 1px !important;
        width: 100px !important;
        height: 70px !important;
        margin-right: 20px !important;
        overflow: hidden;
       background:#666!important;
    }
    .linkwithin_img_0:hover {
      border: 1px solid #666!important;
    opacity:0.8;
    }
    .linkwithin_img_0 div {
        width: 100px !important;
        height: 70px !important;
    }
    .linkwithin_title {
        color: rgb(255, 255, 255) !important;
        font-size: 1.1em !important;
        display: block;
        padding: 0px 10px 0px 0px !important;
        font-weight: 700 !important;
        line-height: 1.45em !important;
        margin-top: 10px !important;
        font-family: "Droid Sans",Helvetica,Arial,sans-serif !important;
       text-decoration:none!important;
      width:120px!important;
    }
    .linkwithin_title:hover {
    text-decoration:underline!important;
    }
    ]]></b:skin>

  7. Click on save template button.
  8. Done!
Congratulation! Now the default linkwithin widget is converted into a stylish related posts widget that will fetch the posts from the same label and show similar posts at the end of your post body.

Need Help?


If you have any doubt about this gadget then feel free to ask me. I will try to solve your all queries. Friends if you like this related posts with thumbnail gadget then please share this post. It will encourage me to write more interesting posts for you. Thanks!
Read More

Backup Blogger Images From Picasa Web Albums

Backup Blogger Images
No doubt that blogger is the top blogging platform and famous among the professional bloggers. There is a myth that Wordpress is more SEO friendly than blogger but this is not fully true. Blogger is a product of Google itself and is growing rapidly between the bloggers. You canoptimize it to make SEO friendly blog and is totally free. You have no need to pay a single buck to create a blog on blogger. Also there is no need to pay additional hosting fees. All of your files and posts are safely host on Google’s server. You can download them at any time to take a backup. You can easily download your blog template, can backup your complete blog data i.e posts of your blog. But there is no option to backup image files which you used in your blog posts. So, today I decided to aware all of you with a trick by which you can also backup your post’s images. Let’s play the game.

Backup Blogger Images


Images which you used for your blog posts are not hosted by blogger itself, they all are hosted on Picasa Web Albums for free which is also own by Google. But we neither can backup them from blogger nor Picasa Web Albums. We can only download them from Picasa Web Albums one by one. And I don’t think that you are interested to backup them by this process and not even me. We all want to backup them instantly to preserve our precious time and to make things easy. That’s why I bring a tutorial for you by which you will be able to backup all images with a single click. Let’s start the tutorial.
  1. Go to Google Takeout.
  2. Click on Choose Services.
  3. google takeout choose services
  4. Now from the list of various services, choose Picasa Web Albums.

  5. Picasa Web Albums
  6. Click on Create Archive button to make a backup.
  7. create archive
  8. It’s time for a little bit processing which run to create backup all of your image files. Once the process is complete you will be able to download your files by simply pressing Download button.
  9. You are done!
Congratulation! Now you have learned that how to take easy backup of blogger images.


Your Turn!


This was all about taking backup of image files which we use in our blogger blog posts. I have shared my knowledge with you. Now it’s your turn to take advantage of this tutorial and start taking backup all your image files to keep a save copy of them which can be used if something misshapen with your blog. It’s advisable to always keep up to date backup of your files to make your blogging happy and safe. Please leave comment below if you have any doubt or query and please give your valuable feedback to me. Thanks!
Read More

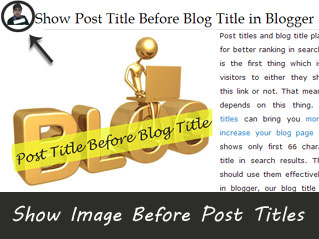
How To Show Image Next to Post Titles in Blogger?

Image Next to Post Titles
Adding an author profile picture or blog's logo next to your blog posts title can improve your blog's look that gives a professional touch to your blog posts. It really help to build your blog readership as it is must to gain reader's trust. When they land to your blog to read the posts, they should feel that there is someone who is willing to build up this blog. No one will like a dead blog. If you will add an author profile image before your blog posts title then they will attract to you and try to communicate with you for any of their queries or feedback. So let's see how to add an image or avatar just before every post titles in blogger.


Adding Image Before Post Titles


Perform these simple steps: 
  1. Go to Blogger.
  2. Navigate to Template >> Edit HTML
  3. Backup your blog template. 
  4. Now press Ctrl+F and search for .post h3 or .post h2
  5. You will find a similar code like this


  6. .post h3 {
    color: #7CA2C4;
    font-size: 20px;
    font-family: Arial, sans-serif;;
    font-weight: normal;
    margin: 0px;
    padding: 0px 10px 0 47px;
    }

  7. Now replace the whole code with this one


  8. .post h3 {
    background:url(Image URL) no-repeat top left;
    color: #289728;
    font-size: 20px;
    font-family: Arial, sans-serif;;
    font-weight: normal; height:45px;
    margin: 0px;
    padding: 0px 10px 0 47px;
    line-height:1.1em;
    }

  9. Now replace Image URL with your image or icon URL.
  10. Now click on save template button.
  11. You are done!
Advice:
Use image under the size of 40px x 40px. It will better if you use an image with white background because it looks nifty.
This was the little trick to show author image before post titles in blogger. If you have any query then feels free to ask me by leaving a comment below this post. Thanks buddy! :)
Read More

How to Add Google Analytics in Blogger?

Install Google Analytics
Once you setup your blog and start publish quality content, its time to track the traffic statistics to know more about the visitors that who are visiting your blog, from where they are, how much time they spend on your blog etc. Google Analytics is the best tool provided by Google to easily track and check real and accurate stats of our blog traffic. Except this you can also check your blog's bounce rate, unique visitors, page views and visits by adding Google Analytics to your blog. Tracking the traffic statistics of blog is very important if you want to know that what's going on your blog and the behavior of your visitors. Now you are aware with the benefits of installing GA in blog so let's see how to install it.

Create Google Analytics Account


Before adding GA tracking code to your blog you need a GA account. Follow below steps:
  1. Go to Google Analytics.
  2. Now sign in with your Google or Gmail account.
  3. Click on "Sign Up" button on the next page.

  4. Google Analytics Sign up

  5. Once you click the sign up button you will redirect to next page there you have to fill a simple form by entering your Blog Title, URL, your Country, Blog Category and Account name. You can enter your blog title as your account name or can choose anything else which helps you to recognize your blog. See below screenshot for complete process.

  6. Setting Up Your Web Property

  7. Once you fill all the details click on "Get Tracking ID" button.
  8. Now click on "I Accept" on "GOOGLE ANALYTICS TERMS OF SERVICE" pop up page.
  9. If everything is fine then you will get a Tracking ID like "UA-39654221-1" at the top left corner and a Tracking code in a box. Now let's go to the next step.

Add Google Analytics to Blogger


To add GA in your blog you have to perform 2 steps. First you have to add your Tracking ID in blogger settings and then put the tracking code in your template.

Adding Google Analytic ID to Blogger 
  1. Go to Blogger >> Settings >> Other
  2. Now under the "Analytics Web Property ID" enter your Tracking ID in the text field.

  3. Tracking ID

  4. Click on "Save Settings" button.
Adding Tracking Code 
  1. Go to Blogger >> Template >> Edit HTML
  2. Backup your blog template. 
  3. Now search for </body>
  4. And paste your Tracking Code just above it.
  5. Save the template.
  6. You are done!
Now you have completed all the process of installing and adding Google Analytics in blogger. It will take approx 24 hours to show your traffic report in Google Analytics. Happy Blogging!
Read More

Sunday, 26 May 2013

SEO Guidelines For New Website/Blogger

SEO Guidelines For New Website/Blogger

Today I am going to tell you some best ways how to improve your blog ranking on Search engine, Alexa-Rank and Google Page Rank. this is basic information about SEO next time we lunch complete course about SEO pack for blog so please subscribe our blog and join our community for learn best things about blogging .

1. How to improve search engine Visibility?
Improving search engine Visibility is that the #1 target of each websites to make it on the highest of each Search Engines results page and it isn't only depending on 1 criteria, rather it is a combination of Back-links Page-rank web traffic/impressions, uniqueness, and content quality of a website.

Here are some ways we can increase search engine visibility.
Use SEO Optimized Blogger Templates
Submit your Websites to Search Engines
Submit Website Sitemap To Webmaster Tools
Display Author image in Google Search Results
Use robots.txt
Complete How to Increase Search Engine Visibility?
2. What is Alexa and how to improve it?
Alexa shows your site's current estimated position and rank on the internet. to improve your Alexa, you need to have many Back-links high Page-rank and thousands of internet traffic/impressions. Alexa doesn't update in real time and usually takes three months to detect your true rank.

Here are some ways we can increase Alexa page rank.
Claim your site on Alexa
Install Alexa Widget on your site
Write a review about Alexa on your blog
Install Alexa Toolbar on your browser
Build quality back links
Ask users to write a review on Alexa
3. What is Page Rank and how to improve it?
Unlike Alexa, Page-rank only shows your site's current estimated position on the web. to improve it, you need to have a lot of Back-links and articles. Like Alexa, Page-rank does not update in real time.

Here are some ways we can increase Google Page Rank.
Write high quality content
Submit Your Site to web and article Directories
Use Link Exchange Program to increase back links.
Keep updating your site/blog everyday
Use Social Bookmarking button to share you site on social sites
Website Advertising
Commenting On Other Blogs and Websites


Read More

Wednesday, 22 May 2013

Top 5 Tips To Improve Alexa Rank


Top 5 Tips To Improve Alexa Rank

alexa rank
After sharing some awesome blogger template with you today I am going to share some of the tips to improve your blog’s alexa rank. The common thing in SEO optimization and in page rank is content. Content is the king and if you are publishing good content then you don't have to work on Alexa rank and page rank because they will automatically increase day by day. Alexa rank updates daily and in page rank it take some months to update page rank. So, lets start the tutorial :)


What is Alexa Rank ?

Alexa is owned by the amazon.com which used to rank the website using website’s traffic, look, performance and backlinks.

1. Content is king

Blog/website’s content plays the key role in the alexa ranking. Always publish fresh and unique content. Never publish copied content because it will decrease your alexa rank and your AdSense account will got disabled.

2. Use Alexa Rank toolbar

The newbie blogger might not know that alexa rank is getting updated daily so to check the change in the alexa rank is better install alexa rank toolbar in to the your browser. Alexa rank is the best way to monitor the status of the blog and website.

3. Promote your website

The Another best way to improve your alexa rank is to publish guest content on other’s blogs. There are many bloggers who accepts the guest post and they will offer the rich back link for your blog so guest posts will help you to build the rich backlink.

4. Be Consistent

A best blog is not the one which contains the huge content, it is the with consistent effective writings. You should not publish article when its ready, you should have time table to publish your article it helps alexa to improve your rank and it will make your website SEO friendly. And Publish regularly and people will realize that you are best in your blog’s niche.

5. Add alexa rank widget

You should add the alexa rank widget in to your blog/website. You have to show off your alexa rank to your visitor so visitors will realize that your website content is great and it will subscribe to your website. Hence your subscribers will increase.

Hope this tips will help you to improve your blog’s alexa rank. If you have any doubt then feel free to ask, make a comment.
Read More

How To Add Meta Tag In Blogger


How To Add Meta Tag In Blogger

meta-tagsAdding the meta tag in to your blogger blog is the smart way to drag traffic in to your blog using search engine. For all the search engine Meta tags are most importantMeta tag are the tags which describe your site and tells search engine whats your site is all about , And meta tag is also plays good role in SEO. In short meta tags are just communicating with search engine and tells more and more information about your blog and it make it index correctly in the search engine. 

So just follow the simple steps to add the meta tag in to your blogger blog. 

1.Sign in into your blogger blog and click on template 
2. Now select EDIT HTML 
meta tag
3.Now find this code (press CTRL + F )
<b:include data='blog' name='all-head-content'/>


4. Now add bellow code just after the above code see in the figure.

meta tag 2


<meta content='your description here' name='description'/> <meta content=' your keywords here' name='keywords'/> <meta content='your name' name='Author'/> <meta content='your email address' name='Email'/> <meta content='global' name='distribution'/> <meta content='5 days' name='revisit'/> <meta content='5 days' name='revisit-after'/> <meta content='document' name='resource-type'/> <meta content='all' name='audience'/> <meta content='general' name='rating'/> <meta content='all' name='robots'/> <meta content='index, follow' name='robots'/> <meta content='en' name='language'/> <meta content='IN' name='country'/> <meta content='blogger' name='generator'/>


Now add description , keyword , your name and your email address and just click on save and you have done !
Read More

Floating Google +1, Facebook, Twitter Buttons For Blogger


Floating Google +1, Facebook, Twitter Buttons For Blogger


social sharing widget
In this tutorial I am going to show you how to add the floating google +1 , facebook , twitter buttons in blogger blog. This is a container having 3 sharing buttons like facebook , google + , twitter. Its so much important for all the bloggers because whenever your reader reades the post and if your reader want to share your post and its easy for them to share your post in facebook , google + and twitter. 
DEMO
Just follow the simple steps to add the floating google +1 , facebook , twitter buttons. 

 
1. Login into your blogger blog 
2.And select Layout 
3.Now click on “add gadget” and select “HTML/Javascript” and paste the bellow code.
<style>
#pageshare {position:fixed; bottom:15%; left:105px; float:left; border: 1px solid white; border-radius:2px;-moz-border-radius:5px;-webkit-border-radius:5px;background-color:#ffffff;padding:0 0 2px;z-index:10;}
#pageshare .sbutton {float:left;clear:both;margin:5px 5px 0 5px;}
.fb_share_count_top {width:48px !important;}
.fb_share_count_top, .fb_share_count_inner {-moz-border-radius:3px;-webkit-border-radius:3px;}
.FBConnectButton_Small, .FBConnectButton_RTL_Small {width:49px !important; -moz-border-radius:3px;-webkit-border-radius:3px;}
.FBConnectButton_Small .FBConnectButton_Text {padding:2px 2px 3px !important;-moz-border-radius:3px;-webkit-border-radius:3px;font-size:8px;}
 </style>
<div id='pageshare' title="Share This With Your Friends">
<div class='sbutton' id='rt'><a href="http://twitter.com/share" class="twitter-share-button" data-count="vertical" >Tweet</a><script src='http://platform.twitter.com/widgets.js' type="text/javascript"></script></div>
<div class='sbutton' id='fb'><a name="fb_share" type="box_count" href="http://www.facebook.com/sharer.php">Share</a><script src="http://static.ak.fbcdn.net/connect.php/js/FB.Share" type="text/javascript"></script></div>
<div class='sbutton' id='gplusone'><script type="text/javascript" src="https://apis.google.com/js/plusone.js"></script><g:plusone size="tall"></g:plusone></div><br/><div style="clear: both;font-size: 12px;text-align:center;"><a href="http://techlosoft.blogspot.in/" target="blank"><font color="silver">Widgets<font></font></font></a></div></div>
 4.Now just save the widget and you have done ! 
Read More

Submit Website Sitemap To Webmaster Tools


Submit Website Sitemap To Webmaster Tools


How to Add Blogger Blog and Website to Google Webmasters Tools

Submit Website Sitemap to Google Webmaster tools is a must for anyone that want to be successful. Once you get verified your site to webmaster tools, then automatically get indexed your site to Google search engine. When your site come to search engine then you will get a lot of traffic.

Follow the easy steps to add Website to Webmaster Tools.

If you create blogs using Blogger, you can automatically add and verify sites by enabling Webmaster Tools directly from the Blogger dashboard.

  1. Log in to https://www.google.com/webmasters/tools/ with your Google account.
  2. Click "Add a site...", enter the base URL of your Google Site in the box that pops up, then click "Continue.".
  3. You will be given with many verification methods. select the Alternate methods tab.
  4. Select the option: Add a meta tag to your site's home page
  5. Copy the meta tag (for example, <meta name="google-site-verification" content="z7mJLjVGtEe2qzCzfE1pamxI4H72u18n4XdxEzgl2AJ" />) from the Instructions box.
  6. Leave the verification page open and go to your site dashboard (in a new tab/window).
  7. Paste the meta tag that you copied on the Google Webmasters Tools after <head> tag in your website. ( "Blogger" go to site Deshbord click Templates > Edit HTML > Ctrl + F and find <head> tag after past  meta tag that you copied on the Google Webmasters Tools.
  8. Click on Save Changes.
  9. Go back to the verification page and click Verify.

Submit Blogger Blog Sitemap To Webmasters Tools


An XML sitemap is a fairly simple XML file that contains info about one or additional URLs on your web site. it's updated whenever you post an article and used by Search engines to crawl blog information. Not only Google but also use by different search engines like Yahoo, Bing,etc. if you can create blog on blogger.com then you do not need to create site map and if you can use hosting & other site or manuly create site map use sitemap create tools, I'm using this tool http://www.xml-sitemaps.com.

Follow the easy steps  to submit Sitemap to Google Webmaster Tools.

  1. Sign in to you Google Webmaster Tools account.
  2. Click on the blog.
  3. Navigate to Traffic > Optimization > Sitemaps and click ADD/TEST SITEMAP button and add the following code inside the box :
atom.xml?redirect=false&start-index=1&max-results=100
If you have more than 200 posts then replace value 100 by something bigger number like 500.

You have successfully added Blogspot blog sitemap to Google Webmasters Tools.

Read More

Earn Money Online With Chitika and Blogger

Earn Money Online With Chitika and Blogger

Apply to be a Chitika Publisher!
Chitika is a PPC program with high rate of payment is a free service that displays revenue-earning ads to your web site or blog visitors that includes different types of ads for different types of traffic. it's very the same as Google AdSense but it is a bit different so the best news is that you can have both on the site at the same time. Google AdSense and Chitika can work friendly and do not violate Terms of Use of each service.

Chitika is that the only ad-network that knows when not to show an ad, helping to protect your user expertise.

Why Use Chitika?


Because chitika is the best way to build cash on-line along the Google AdSense. Chitika can show relevant ads at the right time. several bloggers use Chitika to monetize their blogs and sites and Darren Rowse (from ProBlogger) extremely suggest this service to make money online.


Very Low Minimum Payout


Chitika charges advertisers to be featured aboard your site's content. At the end of each month you're paid supported the previous month's earnings (Net 30). Payments are sent once your account earns a minimum of $10.00 (USD) for PayPal payouts or $50.00 (USD) for checks.

Chitika Referral Program


Never forget to use the Chitika Referral Program, which gives you a share from the publishers and advertisers you refer. This becomes an excellent income if you're able to refer others to join this program. 20% of my chitika earnings ar referral earnings that keeps on going although i'm not using Chitika on my blogs.
Read More

Follow Me on Facebook.com

About

Followers

Popular Posts